TLDR:
Rather than using a white-black colour gradient map for a hillshade layer, use a black@100% alpha to black@0% alpha gradient map. The effect is similar to the multiply blend mode, and the response curve can be adjusted from a straight line to a nonlinear one to adjust contrast.
I’ve been trying to find a way to create a hillshading layer in QGIS that was visually pleasing, but avoided using QGIS’ advanced layer compositing modes.
While the advanced layer compositing modes (multiply/burn/dodge etc.) look great on screen or when outputting a raster, my workflow involves generating a PDF that retains a maximal amount of vector content. This keeps down file size, and retains the ability to do post-production in say, Illustrator with a view to producing high quality prints.
The effect we want is a decrease in the luminosity of the layers underneath the hillshade layer, emphasising the relief in the terrain while leaving flat areas unchanged. The hillshade layer is a single channel, 8-bit raster. The default behaviour in QGIS is to linearly map a white-black gradient (equal RGB values) producing flat areas are white (Luminosity=R=G=B=255), and very hilly areas could reach black (luminosity=R=G=V=0).
The hillshade layer itself is a raster, which has been generated from a DEM using gdaldem:
gdaldem hillshade dem/vmelev_dtm20m/dtm20m/prj.adf dem/dtm20m_hillshade.tif -compute_edges -combined
The combined mode, is ‘a combination of slope and oblique shading.’ It has the benefit of producing minimal values for flat areas.

In insolation, this looks fine as a canvas layer, but we get into trouble when compositing multiple layers. We need to composite it with the layers underneath which involves introducing some element of transparency.
The obvious solution is to make the hillshade partially transparent. The hillshade image was set to be partially transparent in the middle of the middle of the 3 images below. The problem as you can see is that it has become desaturated. Why? Because in the ‘normal’ alpha channel blending mode the result of composition is the hillshade layer’s colour multiplied by its opacity, added to the colour of the layer below. As the flat areas are white, the visual effect is to lighten and desaturate the lower layers.

There are a couple of ways around this. First, we could use a different blending mode, such as ‘multiply’ and no transparency. This multiplies the luminosity of the layer with that of the layer underneath. White (1) = multiply by 1 = no change.
But this is no good here as QGIS doesn’t support the mixing of vector layers and advanced blending modes when writing a PDF. No dice.
How else can we get the same effect?
Create a gradient mapping for the hillshade layer that creates the same effect as layer multiplication blending
We change from having a luminosity gradient to an opacity gradient. Therefore the RGB values will remain constant and instead alpha changes. The net mathematical effect is the same as a white/black gradient map with a multiply blend.
- White -> 100% Transparent black
- Black -> 0% Transparent black
The desired effect is visible in the last of the 3 images above. The opacity of the hillshade layer was also reduced to give a more subtle effect.
In the QGIS style for the hillshade layer, the settings to achieve this look like those below:
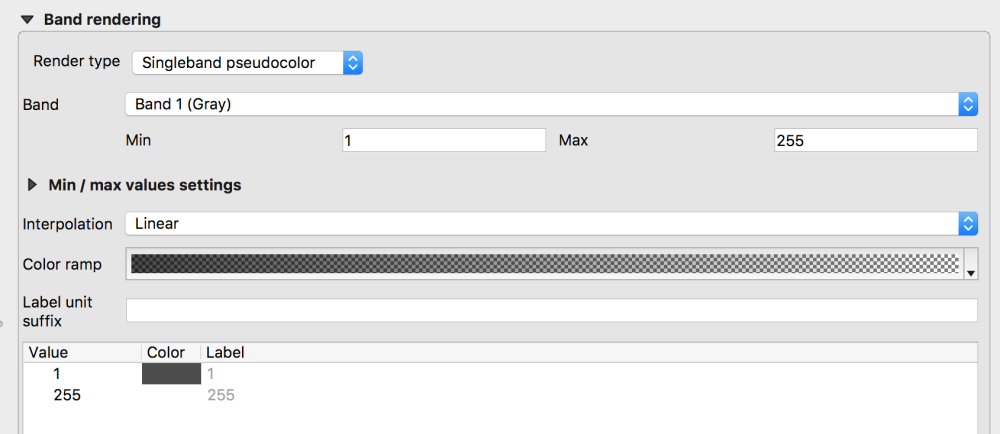
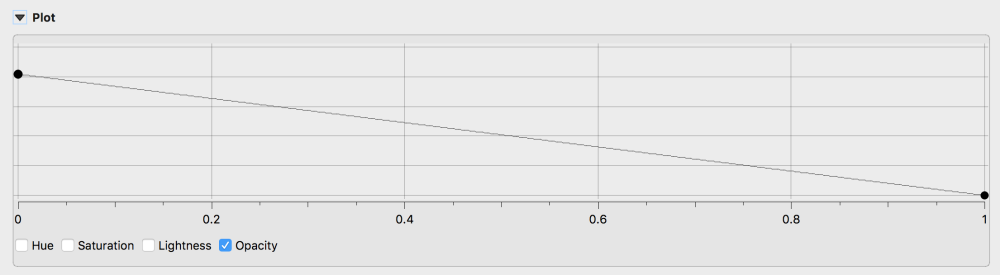
We can also go one stage further, and use a customised response curve in the alpha channel to adjust the contrast/gamma of the hillshade. Below, some transparency is retained even for the darkest values to reduce the strength of the effect.
Other vector layers can be stacked above the hillshade producing the desired combined effect.

